Saturday, August 18, 2012

Library Rules

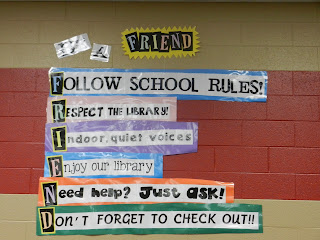
I needed to get the rules up in the library. It took me forever to decide on rules, but after finding this on Pinterest:

library rules

I just needed to tweak it a bit. I didn't like that it looked like a bunch of jumbled letters. I LOVED the premise though! Sooo..I produced this:


Again, we have NO bulletin boards in the library. I wanted to make this last, so it was going to have to be laminated, and our laminator couldn't laminate one huge project, so we broke it up into sections. Again, big thanks to dafont.com for the amazing fonts. I love how much character this has and I feel that the students might be a little more drawn to it. I do, however, notice that I was a little sideways with my strips, but overall I love the turn out!

:-)

Dive Into Reading display

So it's back to school time. I couldn't decide on what I wanted to display, apples, school buses, etc. etc. Soooo, I thought, since it was still so hot outside, why not go with a summer theme? The fact that I found 3 $4 beach chairs at Target also helped with this thought.

So of course, I turned to pinterest and found this:

I wanted to take mine a step further, and since I don't have an actual bulletin board in my library, we went with this:

The die-cut letters we have are just too boring for me. I feel like they are just overused because they are easy, so that is why we went to dafont.com to find a font for our dispaly! Unfortunately we are out of color ink right now, so we just printed in black and white and colored.

Yay! (This was our first project together, and I must say, I am very much looking forward to the rest of the year!)

Update!

So I know I haven't kept up with this blog at all, but now that I have a job as a school librarian I think I will post my pictures here for both reference for me, and ideas for others! Enjoy!

Tuesday, May 18, 2010

Painted Wine glass

Want to have a personalized glass? Well here is how YOU can do it!


What you need:
*Glass
*Paint Brushes
*Paint made for painting glass. (I like to use the stuff that you can bake in the oven rather than waiting 21 days for it to fully dry.)

If you would like the inside of your glass to say something, then the easiest thing to do it print it out:

This one will read "Fill me up!" To make it I used word art, picked a font and then mirrored it and printed it out. Now you need to line it up in your glass so the mirrored part can be read on the OUTSIDE of the glass. It is going to look like jibberish and will be hard to paint, but that is why you have a pattern! The next 3 photos will demonstrate how it will end up after the pattern is OUT.


This is a close-up of where you paint, and make sure it is THICK! (this is the hardest part)


What the bottom of the glass will look out before the rest of the paint.


This is what the inside will look like. Notice you can READ it!

And now you will need to choose a color for the base of the outside of the glass.


The above was painted the smooth technique. *the perks--makes it easy to paint on after. the bad--you will have to do several coats to block out any streaked lines and each time you must wait a significant amount of time so it can dry.


In the above picture I painted a black coat and then used a sponge brush to create a textured look. *The perk--fills in spaces easier and makes it easier to block out light. *The bad--when you paint over the texture it is a little harder and takes more time.

Now look inside...


Here is the "Fill me up!" after the outside is painted pink.


And this is the other one with black. (please ignore the 1 letter that is backwards. 'e'. STILL not sure how that happened..

Now you can paint whatever you want on the outside! I did squiggles for my 2 glasses and inverted the colors. You still have to paint heavy, which is hard and the stem of the glass will be a challenge. For the base I just painted the bottom the solid color I wanted and then added decoration coming off the stem.


Final product! Now go get some wine and fill 'er up!!

Sunday, March 28, 2010

Inner Purse Organizer

Unfortunately this post does NOT include measurements. I have lost my plan, but as soon as I find it I will post it.


Stuff you need: fabric; plan including measurements; sewing machine/needle and thread.


Step 1: Measure and cut what would be the back of the case. Make sure to cut room for flaps for pockets.


Step 2: Cut 2 pieces the same size to fit your inner square.


Step 3: Iron all pieces.


Step 4: Iron back and front together using Interphase (or you can sew)


Step 5: Iron large flap, by folding over so you can begin to see the final result.


Step 6: Start sewing everything into place!


Step 7: Be proud of your work!